Tuesday, October 7, 2014

Halloween Contest!

Hello friends! I haven't posted for awhile but thats because I was busy enjoying the summer and then school started and everything has just been CRAZY! But I'm hopefully getting into a groove and will be back to blogging! Phew!

So anyway, I just wanted to share about a halloween makeup contest. I don't want you guys to enter because I would like to win, but its part of the rules to blog about it so I am. ;)

I'm going to enter a few pictures from past years, but this has totally motivated me to try out some idea's I haven't done yet. I'm just gonna sit around my house looking all crazy--BUT hopefully I'll win so it'll be all good.

Anyway, you can read about the contest here: Classy Cosmetics

Isn't Halloween the best?! I LOVE IT!

Me as a deer last year (my husband was Uncle Si from Duck Dynasty! haha)

And the year before we went as a ventriloquist and his dummy! So much fun!

Friday, June 6, 2014

Stovetop Potpourri

So for the last year or so, I've had a little pot sitting on my stove.
Its always on my stove, to the point where my husband made me go buy one special for this because I was taking away one of our other pots. :) I got this cheapy from Ikea for a couple bucks:

People come over and give me funny looks and ask me what I'm cooking because while some of it may look like food, it sure doesn't look appetizing! haha

What I've got cooking, is some potpourri! I love the way this makes my house smell, I feel like a lot of candles or sprays or plugins don't last very long and don't always make my whole house smell good. But the stovetop stuff really smells delicious, its super easy, and its like a built in humidifier that smells wonderful!

There's quite a few different recipes I've used and they all smell pretty great, but this is one of my favorites. You only need three ingredients: vanilla, lemons and rosemary. (I used fresh rosemary this time, but I've also just used spice rosemary and it works just fine.)
Just slice up your lemons, pour in a tablespoon or so of the vanilla, throw in the rosemary and fill the rest of your pot up 3/4 of the way with water. Voila! (tip: don't fill it up too high, when it starts to boil it will get everywhere or boil over and you don't want that mess!)
Then just turn your burner on. I usually turn mine up to medium high and after it starts boiling I turn it down to simmer.
 After awhile the water will boil down, watch it so you can add more. If you leave it and forget about it all of a sudden the smell will get really strong and things will start burning soon. Not that I have experience with that at all...
This is what it looks like after a few times of it cooking: everything starts turning brown and/or mushy. Thats okay though, it still smells wonderful! Every once in awhile I'll put in a little more vanilla or some lemons or rosemary, whatever I think has cooked down too much and needs more. This will honestly last me for weeks and I LOVE it!

I'll post different "flavors" later on to share some of my favorites! Hope you enjoy this as much as I do!

linked up at Tatertots & Jello

Thursday, May 22, 2014

Backsplash

I thought a backsplash would really finish things off and tie in the sink color with the rest of the room. The nice part of this is that I still had the bead board wallpaper left over from the cabinets, and the wall color in my living room was an exact match for the sink. Score! So I wallpapered one night, painted the next morning, and then glazed that afternoon.


linking up at Tatertots and Jello

Wednesday, May 14, 2014

My Mint Sink

So the sink.

For Christmas this year my in-laws gave us a gift card to Lowe's so we could get a new faucet. The old faucet was crappy and broken and if you got the angle just right it would pop the whole handle off. We just dealt with it because...yeah. Cheap.

After they gave us the gift card it got the kitchen re-do gears really going. I had already bought the paint for the cabinets, and this made me want to go beyond just painting cabinets into really giving the whole kitchen a face lift. I thought, if we get a new faucet, I want to get a new sink (because the old one was very shallow, and let's face it, I have four kids and that equals a lot of dishes, and I'd like them to hide a little lower in the sink, if ya know whatta mean.) And then I thought, I don't want to get a brand new sink and faucet and put it on those crappy beat up counters! (There was a lot of thinking if you can't tell...)

So I redid the counters. And in the middle of doing the counters, I had my brother in law come over and install the new sink.

But I'm getting ahead of myself! First off, I started searching through sinks online and trying to find one that would work and also be affordable. I started with stainless steel and moved on to looking at apron fronts (so beautiful...so expensive) then came across the acrylic sinks. Okay then, good prices, not very special but...thats when I saw a mint colored one and was like:


I briefly ran it by my husband, but who's kidding, I do all the decorating stuff and I make the choices... ;)
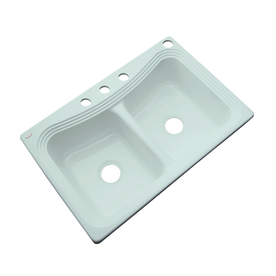
This is the one I ended up special ordering from Lowes--it says its "sea foam" but its very much a minty blue. I was very happily surprised when I opened it up that the color didn't have any sort of olive green to it, which I was a little worried about.
Dekor Master Double-Basin Drop-in Acrylic Kitchen Sink
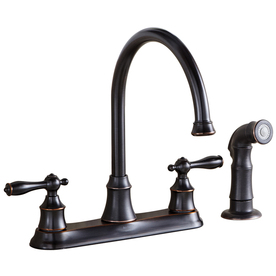
and this is the faucet I chose with it (love the high arch of the spout).
AquaSource Oil-Rubbed Bronze High-Arc Kitchen Faucet with Side Spray


So for just over $300, I'd say thats a pretty good deal and the fact that every time I look at it I grin like a fool, I say it was a good choice for me!

So what do you think? Is a mint sink crazy? Would you ever do a colored sink?

linking up at Tatertots and Jello


Saturday, May 3, 2014

Kitchen Counters

I've had quite a few different ideas of what I wanted to do to fix our counters. I sort of love butcher block and wanted to go that route for a long time. Ikea has a pretty great price for butcher block, but our counter has a weird section that made it so their's wouldn't be wide enough in just one spot. Plus, I was hoping for a little bit cheaper...

Then I came across this post about Ardex concrete. And I was super excited about it! I thought concrete would look great and this seemed cheap as well. As I started looking into it, there was only one store that sells this and its about half an hour away from me and is open only a few days a week and at odd times...hmmm, okay I still think I can make it work...right?

Then I researched it some more and saw more reviews on it and while I still think it could be great, it seemed to be a LOT of work, and a LOT of mess and maybe not as cheap as I was thinking.

SOOOOoooooooo, then I saw this post about spray painting your counters. And I decided this was the way to go.

Overall, this cost me maybe $50 for entirely "new" countertops. Do they look like concrete? Maybe in pictures but in real life it looks like we just got new formica or laminate tops. Which I'm okay with. :)

Also, because I had control over this, I did one side of our kitchen at a time. That meant that my entire kitchen didn't have to be a complete disaster zone and out of commission. Which was good because my family likes to eat ya know??

Anyway, on to the pictures! This is what it started out like:
                                               crappy yellow-y tan counters from the 80's...
                      ...and it was NOT me. It was the old owners, I feel bad things towards them.
                                                                    also NOT from me.

Here's the materials I used- only the one can of primer, and I ended up using about four cans of the stone texture spray paint:
I sanded it down really quickly (I wasn't too worried about it since it was old and a lot of the shine had worn off already) and then taped everything off.
Here's what it looked like before I started spraying, I wanted to be sure the overspray from the spray paint wouldn't get everywhere.

This is after the primer went on, its still wet here. I only did one coat and wasn't worried about it being even or consistent.

This is after one coat of the textured spray paint:
After I got it all spray painted and evenly coated, I started on with the polyurethane. I read to use a water based one, because it won't yellow over time. I did like eight coats of this, you have to wait two hours between coats, so it took me about two days to do this. Nice thin even coats, not too hard just have to wait in between. I made everyone stay away from it and not use it hardly at all for about a week. My husband was not happy about this...he kept saying "WHATS THE POINT OF HAVING COUNTERS IF WE CAN'T USE THEM??" He's a little dramatic.

Here's the other side all finished:


I love the texture that the stone spray paint brings, and the poly really makes it look like nicer laminate.
hint: Do you see my new SINK?!? Its MINT!! I will do a post on that next! Yay!
Linking up at Tatertots and Jello

So I just wanted to give a little update/tip things: I had a friend who wanted to do this and we ran into a few snags. She was trying to get it done really quickly before she left on a trip (so then they would be off the counters the time they were gone), so we were rushing a bit. When we went to put our first coat of poly on it started streaking in spots because the stone spray paint wasn't completely dry. So PLEASE make sure its dried all the way. Also, if you don't have time and need to rush--don't do this project. :) So, I guess the only other tip I have is that you need to be a careful painter. If you have no experience with spray paint, practice on something else. You have to know how to evenly spray and not get drips and too heavy in spots. If you don't feel confident in your spray painting skills--ask someone else to spray for you okay? And just make sure you really make the poly coats thin and even. Hope that covers it, if you have any questions please ask in the comments! I'm happy to answer anything you might think of. :)

Friday, April 11, 2014

Lumberjack Glam!

For my birthday this year I really wanted to throw a fun dress up party! I LOOOVE themed parties, last year for my 30th birthday we did a Great Gatsby theme--so much fun!
My sister and I ;)
                            My sweet friend who looked so dang cute!
I had a tutorial going to teach us the Charleston

So this year, after seeing the awesome pictures from the Glam Lumberjack Jam in Utah I decided I HAD to do it too! Just too much fun!

We had themed food to go along with it, things like sausage and flap jacks and bacon maple cupcakes--and of course lots and lots of treats!


We played games like this one--you have to pick the box up with your mouth without touching the ground with her hands or anything else, the box gets progressively shorter--very funny!

 We also had a campfire outside to roast marshmallows, I love fun parties!!

What about you? Are you a dress up kind of gal or do you hate it?! :)